Alright, diving into the world of water quality testing can feel like gearing up for a major science exam, right? There’s a ton to remember, from EPA guidelines to specific testing methods.
I remember when I first started, I felt completely overwhelmed trying to keep track of everything. It’s not just about memorizing facts; it’s understanding why each test matters and how it contributes to safeguarding our water resources.
Thankfully, with a solid checklist and a bit of preparation, you can tackle it head-on. Let’s make sure you’re fully equipped to ace those water quality tests!
Let’s make sure you’re totally prepared.
Alright, diving into the world of water quality testing can feel like gearing up for a major science exam, right? There’s a ton to remember, from EPA guidelines to specific testing methods.
I remember when I first started, I felt completely overwhelmed trying to keep track of everything. It’s not just about memorizing facts; it’s understanding why each test matters and how it contributes to safeguarding our water resources.
Thankfully, with a solid checklist and a bit of preparation, you can tackle it head-on. Let’s make sure you’re fully equipped to ace those water quality tests!
Essential Equipment and Gear: Getting Your Toolkit Ready

Before you even think about dipping your toes—or your testing equipment—into the water, you’ve got to assemble your arsenal. It’s not just about having the fanciest gadgets; it’s about having the *right* gadgets and making sure they’re in tip-top shape.
Think of it like prepping for a big hike: you wouldn’t hit the trail without sturdy boots, a map, and plenty of water, would you? Same principle applies here.
1. Gathering the Core Sampling Equipment
When it comes to the core sampling equipment, I always emphasize having a variety of tools for different scenarios. For instance, a Van Dorn sampler is fantastic for collecting water samples at specific depths without disturbing the stratification.
I’ve used it in deep lakes where temperature layers were critical to understanding the ecosystem dynamics. On the other hand, a simple grab sampler might suffice for shallow streams or ponds.
And let’s not forget about the importance of having sterilized sample containers. I once made the mistake of using a container that wasn’t properly cleaned, and it completely skewed my results, making the water seem more contaminated than it actually was.
Proper prep prevents poor performance!
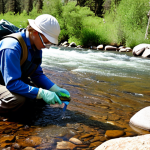
2. Don’t Forget the Protective Gear and Safety Measures
Safety first, always! This isn’t just some catchy slogan; it’s a cardinal rule. Protective eyewear, gloves, and appropriate clothing are non-negotiable.
I can’t stress this enough. I remember one time, a colleague of mine was collecting samples from a site known for industrial runoff, and a splash of water landed on his hand.
Thankfully, he was wearing gloves, but it was a stark reminder of the potential hazards lurking in seemingly ordinary water bodies. Depending on the site, you might also need waders, a life vest, or even a respirator.
It’s always better to be over-prepared than to risk exposure to harmful substances. Familiarize yourself with the site’s safety data sheets (SDS) and emergency protocols before you even set foot near the water.
Mastering Testing Protocols and Documentation
Alright, you’ve got your gear, you’re looking sharp in your protective gear. Now, let’s get down to the nitty-gritty of testing protocols. This is where precision and attention to detail become your best friends.
Trust me, cutting corners here will only lead to headaches down the road.
1. Understanding Standardized Testing Methods (e.g., EPA Guidelines)
First off, familiarize yourself with the standardized testing methods, especially the EPA (Environmental Protection Agency) guidelines. These aren’t just suggestions; they’re the gold standard for ensuring accurate and reliable results.
I spent weeks poring over these guidelines when I first started, and it paid off big time. Knowing the ins and outs of these protocols helps you understand why each step is crucial and how to troubleshoot potential issues.
For example, the EPA has specific methods for testing for different contaminants, from heavy metals to organic compounds. Following these ensures your results are comparable and defensible.
2. The Art of Meticulous Record-Keeping
Now, let’s talk about documentation. I cannot emphasize enough how vital meticulous record-keeping is. This isn’t just filling out forms; it’s about creating a comprehensive log of everything you do, see, and observe during the testing process.
I use a detailed field notebook where I jot down everything from the weather conditions (which can affect water chemistry) to any unusual observations at the site, like strange odors or discoloration.
I also meticulously record the date, time, location, and specific testing parameters for each sample. Photos and videos can also be invaluable. I once used a series of photos to document a change in water clarity over time, which helped us identify a source of pollution upstream.
3. Calibration and Maintenance of Equipment
One aspect often overlooked, especially by newcomers, is the calibration and maintenance of testing equipment. Think of your instruments like your car; you wouldn’t drive for miles without regular check-ups, would you?
The same goes for your pH meters, dissolved oxygen probes, and other sensors. Calibration ensures that your readings are accurate, and maintenance prolongs the life of your equipment.
I make it a habit to calibrate my pH meter before each testing session, using a series of buffer solutions. And after each use, I clean and store my equipment according to the manufacturer’s instructions.
Neglecting this can lead to inaccurate results and costly repairs.
Navigating the Site and Sample Collection Like a Pro
Okay, you’re prepped, you’re certified – now it’s time to hit the field. But hold up, don’t just charge in like a bull in a china shop. Approaching a testing site and collecting samples requires a bit of finesse and a whole lot of planning.
1. Scouting the Location and Identifying Key Sampling Points
Before you even think about dipping a sample bottle, take the time to scout the location. I mean, really *scout* it. Walk the perimeter, observe the surroundings, and identify any potential sources of contamination or factors that might influence your results.
This could include industrial discharge pipes, agricultural runoff, or even nearby construction sites. Identifying key sampling points is also crucial.
Don’t just grab a sample from the most convenient spot. Think strategically about where you’re most likely to find the contaminants you’re looking for.
For example, if you’re testing a river downstream from a wastewater treatment plant, you’ll want to collect samples both upstream and downstream of the discharge point to assess its impact.
2. Mastering Different Sampling Techniques
There’s more to collecting a water sample than just dunking a bottle in the water. Different situations call for different techniques, and mastering these can make or break your results.
For example, when sampling from a stream or river, you want to collect your sample from the main flow, avoiding stagnant areas or the edges. Also, be sure to sample against the current to avoid stirring up sediment that could contaminate your sample.
If you’re sampling from a lake or pond, you might need to use a depth sampler to collect water from different layers. And when collecting samples for bacteria analysis, you need to use sterile techniques to avoid introducing any external contamination.
3. Staying Aware of Environmental Conditions and Potential Hazards
Remember, you’re not just a scientist; you’re also an environmental steward. Be mindful of the environment and minimize your impact while you’re on site.
Avoid disturbing vegetation, walking through sensitive areas, or leaving behind any trash. And always be aware of potential hazards, such as slippery rocks, steep banks, or wildlife.
I once encountered a family of beavers while sampling in a remote wetland. While they were cute to watch, I had to be careful not to disturb their habitat or get too close, as they can be quite territorial.
Understanding Water Quality Parameters
Delving into water quality is like understanding the ingredients in your favorite dish. Each parameter plays a crucial role in determining whether the water is safe, healthy, and sustainable.
Here’s a quick rundown of some of the heavy hitters:
| Parameter | Why It Matters | Acceptable Levels |
|---|---|---|
| pH | Indicates acidity or alkalinity. Affects solubility and toxicity of substances. | 6.5 – 8.5 (for most aquatic life) |
| Dissolved Oxygen (DO) | Essential for aquatic life; low levels can cause stress or death. | > 5 mg/L (for most fish) |
| Turbidity | Measures water clarity; high turbidity can reduce light penetration and harm aquatic plants. | < 5 NTU (Nephelometric Turbidity Units) |
| Temperature | Influences metabolic rates of aquatic organisms and oxygen solubility. | Varies based on species and location |
| Nitrates & Phosphates | Excess nutrients can cause algal blooms and eutrophication. | < 10 mg/L (Nitrates), < 0.1 mg/L (Phosphates) |
1. Decoding pH Levels and Their Impact on Aquatic Life
pH is like the foundation of water chemistry. It tells you whether the water is acidic or alkaline, and this affects everything from the solubility of nutrients to the toxicity of pollutants.
Most aquatic organisms thrive in a relatively neutral pH range, around 6.5 to 8.5. When pH levels stray too far from this range, it can cause stress, inhibit reproduction, or even kill aquatic life.
I once worked on a project where acid rain was causing the pH levels in a mountain stream to plummet. This was devastating to the local trout population, as the acidic water interfered with their ability to absorb essential minerals.
2. The Significance of Dissolved Oxygen for a Healthy Ecosystem
Dissolved oxygen (DO) is literally the breath of life for aquatic organisms. Fish, insects, and other creatures need DO to survive, just like we need oxygen to breathe.
Low DO levels can lead to fish kills and other ecological disasters. DO levels can be affected by a variety of factors, including temperature, organic matter, and pollution.
Warmer water holds less oxygen, so DO levels tend to be lower in the summer. And when organic matter decomposes, it consumes oxygen, which can further deplete DO levels.
3. Understanding Turbidity and Its Effects on Light Penetration
Turbidity is a measure of water clarity, or how much suspended material is in the water. High turbidity can reduce light penetration, which can harm aquatic plants and disrupt the food chain.
Turbidity can be caused by sediment, algae, or other particles. I’ve seen lakes turn completely murky after heavy rainfall, as sediment washed into the water from surrounding areas.
This not only made the water look unappealing but also reduced the amount of sunlight reaching the bottom, which stunted the growth of aquatic plants.
Data Analysis and Interpretation: Making Sense of Your Results
You’ve got your samples, you’ve run your tests, and you’ve got a whole heap of data staring back at you. Now what? This is where the magic happens – where you transform raw numbers into meaningful insights.
1. Applying Statistical Methods for Accuracy
Statistics aren’t just for academics; they’re an essential tool for anyone analyzing water quality data. Statistical methods help you identify trends, assess the significance of your results, and account for variability.
For example, you can use statistical tests to compare water quality parameters at different sites or over time. This can help you determine whether there are any significant differences or whether changes are simply due to random variation.
I often use regression analysis to look for relationships between different parameters. For example, is there a correlation between nutrient levels and algal growth?
2. Comparing Results to Established Standards and Benchmarks
The numbers themselves might not mean much until you compare them to established standards and benchmarks. This is where you assess whether your results are within acceptable limits or whether they indicate a potential problem.
Regulatory agencies like the EPA have set standards for a variety of water quality parameters, based on scientific research and risk assessment. These standards are designed to protect human health and the environment.
3. Communicating Findings and Recommendations
Analyzing and interpreting data is only half the battle. The other half is communicating your findings to others. This could include writing a report, giving a presentation, or simply sharing your results with stakeholders.
Effective communication is crucial for informing decision-making and promoting positive change.
Troubleshooting Common Testing Issues
Even the most seasoned water quality testers run into hiccups. The key is to know how to troubleshoot those issues and get back on track.
1. Addressing Equipment Malfunctions and Calibration Problems
Equipment malfunctions are a fact of life, especially when you’re working in the field. The best way to minimize these issues is to perform regular maintenance and calibration.
But even with the best care, things can still go wrong. I always carry a backup kit with essential spare parts and tools. This has saved me countless times when a probe suddenly stopped working or a battery died unexpectedly.
2. Identifying and Rectifying Sample Contamination
Sample contamination is a major headache, as it can completely invalidate your results. The best way to prevent contamination is to follow strict sampling protocols and use sterile equipment.
But if you suspect contamination, don’t panic. Take a deep breath and try to identify the source.
3. Dealing with Unexpected Field Conditions
The field is an unpredictable place, and you’re bound to encounter unexpected conditions from time to time. This could include sudden weather changes, equipment failures, or even encounters with wildlife.
The key is to be prepared for anything and to adapt to the situation. I always check the weather forecast before heading out and pack extra gear in case of rain or cold temperatures.
And I always let someone know where I’m going and when I expect to be back, in case of emergencies. With these tips, you’re not just prepared; you’re practically a water quality whisperer.
Happy testing! And there you have it! Navigating the intricacies of water quality testing might seem daunting at first, but with the right gear, knowledge, and a dash of practical experience, you’re well on your way to becoming a proficient guardian of our water resources.
Remember, every test, every sample, and every data point contributes to a larger picture of environmental stewardship. So, keep learning, keep exploring, and keep making a positive impact!
Useful Tips to Remember
1. Invest in a Reliable Water Quality Meter: A good meter can save you time and ensure accurate readings. Look for one that measures multiple parameters.
2. Create a Sampling Schedule: Consistency is key. Set up a regular sampling schedule to monitor changes over time.
3. Stay Updated on Regulations: Environmental regulations can change, so stay informed about the latest guidelines.
4. Join a Local Water Monitoring Group: Connect with other enthusiasts and experts to share knowledge and experiences.
5. Educate Others: Share your findings and educate your community about the importance of water quality.
Key Takeaways
Preparation is Paramount: Gather the right equipment, understand the protocols, and familiarize yourself with the site.
Accuracy Matters: Follow standardized testing methods, maintain meticulous records, and calibrate your equipment regularly.
Safety First: Always prioritize safety by wearing protective gear and being aware of potential hazards.
Knowledge is Power: Understand the significance of different water quality parameters and how they impact aquatic life.
Communicate Effectively: Share your findings and recommendations to inform decision-making and promote positive change.
Frequently Asked Questions (FAQ) 📖
Q: Okay, so what’s the absolute first thing I should do before even thinking about running a water quality test?
A: Honestly, the very first thing? Check your testing kit’s expiration dates! Seriously.
I learned that the hard way once – got wildly inaccurate results because I was using expired reagents. It’s like trying to bake a cake with baking powder that’s been sitting in the cupboard for five years; it’s just not going to rise properly.
Also, double-check you have all the necessary equipment laid out. There’s nothing worse than getting halfway through a test and realizing you’re missing a crucial piece.
Q: There are SO many different water quality tests. How do I even begin to figure out which ones I actually need to do?
A: That’s a really common head-scratcher! Start by thinking about why you’re testing in the first place. Are you checking the water at your home because you’re worried about lead, or are you testing a local stream as part of a volunteer monitoring program?
The purpose directly dictates the tests. For example, if you’re on well water, you should probably look at testing for bacteria (coliform), nitrates, and maybe even arsenic depending on your location.
Look into your local EPA recommendations or contact a water testing lab – they can provide tailored advice based on your situation and geographical area.
Don’t just randomly test for everything under the sun; that’s a waste of time and money!
Q: I’ve heard a lot about quality assurance and quality control in water testing. What’s the big deal? It seems like extra work.
A: Trust me, it’s extra work that’s totally worth it! Think of QA/QC like proofreading a really important document. It ensures that your results are reliable and accurate.
This means running blanks (tests with distilled water to check for contamination), duplicates (repeating the test on the same sample to check for consistency), and using known standards (solutions with a precisely known concentration of the analyte you’re testing for).
I remember when I didn’t bother with the duplicates, and I got this one bizarre result. Turned out I’d misread a scale! QA/QC helps catch those errors before you make any serious decisions based on bad data.
Plus, if you’re submitting data to a regulatory agency or using it for scientific research, proper QA/QC is usually a must.
📚 References
Wikipedia Encyclopedia
구글 검색 결과
구글 검색 결과
구글 검색 결과
구글 검색 결과
구글 검색 결과